Foundations of Software Development
- Version Control
For any repeatable process version control is essential. Here are some notes on using subversion in a windows XP environment with the svnserver. I'd recommend downloading the TortoiseSVN client and the ankhsvn Visual Studio integration plugin. Get a free book.
- Getting Started
- Download and Install the software
Visit https://subversion.tigris.org/. Follow instructions. Takes about 2 minutes for the entire process.
- Create a repository
C:\>mkdir c:\svn-repos
C:\>svnadmin create c:\svn-repos
- Start the service
This is only needed if you are going to use the svn protocol to talk with the repository. This is best if everyone is using a private network. You can also use http, a local file URL, or svn+ssh.
start svnserve --daemon --root c:\svn-repos
- Configure the svnservice
Go to C:\svn-repos\conf and edit the following files:
- svnserve.conf
[general]
anon-access = read
auth-access = write
password-db = passwd
- passwd
[users]
whedon = secretpassword
mreynolds = serenity
zwashbourne = browncoats
- svnserve.conf
- Import source files into repository
Go to the top level of a temporary directory that contains your source code and import it into a project name/trunk. In the following example, "mbus-pd1317" is the machine name hosting the svnservice and "scythe" is the project name. Be careful, subversion cares about case even on windows.
svn import -m "initial import" . svn://mbus-pd1317/scythe/trunk
It will ask you for a password and then import your files into subversion.
- Get a copy into your working directory
Now that the code is in the repository, change directory to one level above where you want the files and checkout the files. (Note: the checkout does not lock the files.)
cd C:\workfiles
svn co svn://mbus-pd1317/scythe/trunk scythe
- Delete extra files
If you're like me, you included extra files. To remove the extra directories of "bin" and "obj", navigate to the directory above them and use the "del" command.
svn del bin obj
- Download and Install the software
- Normal Operations
- setting the editor
subversion will want to use 'vi' as the default editor for entering comments on operations. You can use notepad instead by entering the following:
set SVN_EDITOR=notepad
(To make permanent: right-click on "My Computer"/Properties/Advanced.../Environmental Variables and set a value for SVN_EDITOR).
You can also use vi the SFU package from microsoft and set the terminal type to 'interix' (set TERM=interix).
- update
Before editing a file, it's a good idea to get a fresh copy from the repository with the update command.
svn update hello.rb
At revision 114.
- Checking in a file
You don't have to "check out" a file and get a lock on it, although you can. Although most people are queasy about this, it's a good thing - really. To check in a file,
svn ci hello.rb -m"got dependency injection working."
Sending        hello.rb
Transmitting file data .
Committed revision 115.
What happens if someone else has checked in the file since you got your copy?
C:\home\mfincher\ruby>svn ci -m"add ! on first line."
Sending        hello.rb
svn: Commit failed (details follow):
svn: Out of date: '/ruby/trunk/hello.rb' in transaction '49-1'
You have to do an update
C:\home\mfincher\ruby>svn update
G    hello.rb
Updated to revision 49.
The 'G' tells us subversion was able to merGe changes successfully.
What if you have changed the same lines as the new version and subversion can't automatically merge?
C:\home\mfincher\ruby2>svn update
C    hello.rb
Updated to revision 50.
The 'C' means a Conflict occured.
If you look at your file, conflict markers have been added.
C:\home\mfincher\ruby2>cat hello.rb
<<<<<<< .mine
puts "Helo World?"
=======
puts "Helo World!!"
>>>>>>> .r50
puts "goodbye!"
Hand edit your code to resolve the conflict and the tell subversion you have resolved the issue.
C:\home\mfincher\ruby2>svn resolved hello.rb
Resolved conflicted state of 'hello.rb'
Then checkin your resolved code.
C:\home\mfincher\ruby2>svn ci -m"changed puncuation to ?!" hello.rb
Sending        hello.rb
Transmitting file data .
Committed revision 51.
- setting the editor
- Add a workfile
use the 'add' command. Note that it is note in the repository until you do an update.
C:\home\mfincher\ruby>svn add hello.rb
A         hello.rb
C:\home\mfincher\ruby>svn ci -m"initial version" hello.rb
Adding         hello.rb
Transmitting file data .
Committed revision 41.
- Viewing information
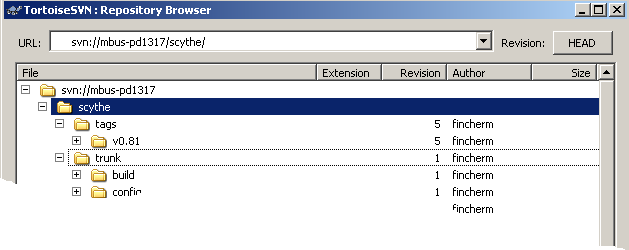
- Viewing the repository
Using tortoiseSVN we can look at our repository. Right click on any directory.
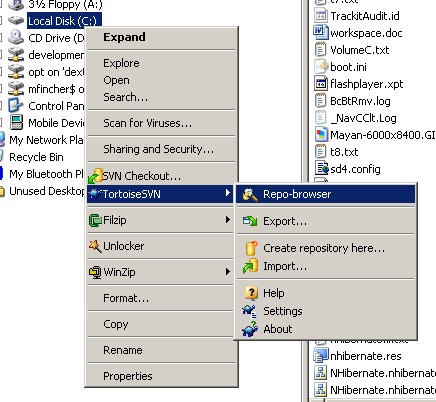
and select the repository browser. Enter the location of your repository in the URL text field. Then you can navigate around the database.
- status command
Normally "status" tells you which files are not under version control. With the "--verbose" or "-v" option it shows the version number of files.
svn status -v
To see if your copies are out-of-date with the repository's (-u is the abbreviated form):
svn status --show-updates
- svn diff
Shows all the differences in your files and the repository.
svn diff
- svn info
Shows info about the repository attached to your directory.
svn info
- svn list
Shows the files in the repository, regardless of what is in your local directory.
svn list
- svn cat
types the contents of the revision to the screen
svn cat hello.rb -r49
- Viewing the repository
- revisions
subversion has global revision numbers, not for individual files. To help identify versions, four psuedo-version keywords are available: HEAD - the latest copy in the repository; BASE - the unmodified local copy; COMMITTED The last revision where an item changed before BASE; PREV - the one before the last change. Dates can also be used to find versions. Dates, keywords and revision numbers can be used freely together.
svn log -r HEAD #get the latest checkin comments svn diff -r 103:113 hello.rb svn log -r 103:113 hello.rb svn diff --revision {2006-05-22}:COMMITTED hello.rb - revert command
If you have only changed your local copy of a file, you can use the "revert" command to get a fresh copy of it from the cache.
svn revert test.cs
- Reverting to an earlier version.
You can revert a single file or the whole project with the merge command. The following takes the repository back from version 55 to version 53.
svn merge -r 55:53 .
- merge command
The merge command can be used to take your repository back in time. For example, if you decide that all the changes since 56 are bogus, you can revert your entire tree back to version 53 with the following:
svn merge -r 56:53 svn://mbus-pd1317/scythe/trunk
svn commit -m"removed all the margarita inspired code and went back to 53"
- copy
copy can be used to bring back the dead. If you want to use an older version of a file, copy the revision you need into your tree and then commit.
svn copy --revision 53 svn://mbus-pd1317/scythe/trunk/file1.c ./file1.c
-
svn co file:///c:/svn-repos/ruby/trunk -r 50 .
- Tags and Branching
- Creating tags
Tags in subversion are really just directories. To start, create a "tags" subdirectory.
svn mkdir -m "tags directory" svn://mbus-pd1317/scythe/tags
Then copy the trunk over to the tags directory
svn copy -m "v0.81" svn://mbus-pd1317/scythe/trunk svn://mbus-pd1317/scythe/tags/v0.81
subversion doesn't really copy a physical version, just a logical one.
- Retrieving tagged files.
To get a particular tagged version, checkout the directory with the tag.
svn co svn://mbus-pd1317/scythe/tags/v0.81 .
- Creating tags
- Misc commands
- svn cleanup
Removes leftover flotsam
svn cleanup
- Backup the repository
Backing up a repository is easy.
cd c:\svn-repos
C:\svn-repos>svnadmin dump . > svn-dump-2006-06-08
* Dumped revision 0.
* Dumped revision 1.
...
- Load a repository
C:\>svnadmin create svn-reposNew
C:\>svnadmin load svn-reposNew < svn-repos\svn-dump-2006-06-08
- help
'help' provides concise summaries of the commands.
svn help
svn help merge
- svn cleanup
- Getting Started
- Build - Nant (Real Section Coming Soon)
- Miscellanous tips
- Using target::get-current-target() to avoid repeating yourself (DRY)
When one nant files calls multiple others with the same target, it's handy to use the "get-current-target" function to avoid duplicating the target name - this may get you into trouble when cutting and pasting.
<target name="clean" depends="init" failOnError="false"> <nant buildfile="ScytheComponents.build" target="${target::get-current-target()}" /> <nant buildfile="ScytheService.build" target="${target::get-current-target()}" /> </target> - How to replace text in a string variable
We don't need the "${}" around the "build.version".
<property name="build.version" value="3.4" /> <property name="db.suffix" value="${string::replace(build.version,'.','')}" /> <echo message="db.suffix: ${db.suffix}"/> - How to pass in variables that override internal properties
Here's how to set the location of the nunit console app from the command line. If not set on the command line, a default is used.
nant -buildfile:SurveyDirectorCc.build -D:nunit.console.exe="C:/Program Files/NUnit 2.4.1/bin/nunit-console.exe"
<property name="nunit.console.exe" value="E:\Nibus\Apps\NUnit 2.4.1\bin\nunit-console.exe" unless="${property::exists('nunit.console.exe')}"/>
- Using target::get-current-target() to avoid repeating yourself (DRY)
- Working with Visual Studio 2008
- Miscellanous tips
- Testing - NUnit (Coming Soon)
- Logging - Log4Net (Coming Soon)
- CruiseControl.Net
Cruise Control aids in continuous integration. CC.Net will kick off a build process when the events you specify fire. Typically this is a checkin of new code. CC.Net will monitor your source control system at a frequency you select.
- Download
CruiseControl.Net can be downloaded from sourceforge.net
- Edit the ccnet.config
Located at C:\Program Files\CruiseControl.NET\server\ccnet.config. Here's an example:
<cruisecontrol>
	<project name="Scythe">
		<triggers>
			<intervalTrigger seconds="600" buildCondition="IfModificationExists"/>
		</triggers>
   <!-- CruiseControl needs this to know when something has been checked in -->
		<sourcecontrol type="svn">
			<trunkUrl>svn://myversioncontrolserver/scythe/trunk</trunkUrl>
			<workingDirectory>c:\dev\scythe</workingDirectory>
			<username>myusername</username>
			<password>mypassword</password>
			<tagOnSuccess>false</tagOnSuccess>
		</sourcecontrol>
		<tasks>

			<nant>
				<executable>C:\opt\nant-0.85\bin\nant.exe</executable>
				<baseDirectory>C:\workfiles\scythe\InProgress\scythe-build\v0.85-debug</baseDirectory>
				<buildArgs></buildArgs>
				<buildFile>C:\workfiles\scythe\Scythe_Nightly.xml</buildFile>
				<targetList>
					<target>stop</target>
					<target>uninstall</target>
					<target>clean</target>
					<target>get</target>
					<target>build</target>
					<target>package</target>
					<target>deploy</target>
					<target>report</target>
					<target>install</target>
					<target>start</target>
				</targetList>
				<buildTimeoutSeconds>1800</buildTimeoutSeconds>
			</nant>
			<nunit>
				<path>C:\Program Files\NUnit 2.2\bin\nunit-console.exe</path>
				<assemblies>
					<assembly>C:\workfiles\scythe\InProgress\scythe-build\v0.85-debug\src\ScytheComponents\bin\debug\ScytheComponents.exe</assembly>
				</assemblies>
			</nunit>
		</tasks>
	</project>
</cruisecontrol>
- CC can be run in two different modes.
To start with it's best to run in the console so you can debug your scripts.
C:\home\mfincher>cd C:\Program Files\CruiseControl.NET\server
C:\Program Files\CruiseControl.NET\server>ccnet.exe
- buildCondition
For testing swith the buildCondition from "IfModificationExists" to "ForceBuild".
<triggers>
	<intervalTrigger seconds="10" buildCondition="ForceBuild"/>
</triggers>
- Using Perforce as source control
Note in the sample code block below that the "client" element is really a "workspace" in perforce.
<sourcecontrol type="p4"> <view>//depot/scythe/</view> <executable>c:\Program Files\Perforce\p4.exe</executable> <client>scythe-build</client> <user>fincherm</user> <port>myhost:1666</port> <applyLabel>true</applyLabel> <autoGetSource>true</autoGetSource> <forceSync>true</forceSync> <p4WebURLFormat>https://localhost:8080/@md=d&cd=//&c=3IB@/{0}?ac=10</p4WebURLFormat> </sourcecontrol>The new workspace "scythe-build" has a view of "//depot/scythe/... //scythe-build/..." and a root of "C:\depot\scythe". The root has to go straight to your branch.
- How to delete all the files before your ccnet run?
Use the "prebuild" tag. You cannot use the "<del dir="mydir" />" since CCNET doesn't understand regular nant tags. So you have to use the "exec" tag. Since "del" is not a regular executable, but it hides in the "command" program you have to do a little more work:
<prebuild> <exec> <baseDirectory>c:\workfiles\scythe</baseDirectory> <executable>C:\WINDOWS\system32\cmd</executable> <buildArgs>/C del/F/Q/S c:\workfiles\scythe</buildArgs> <buildTimeoutSeconds>10</buildTimeoutSeconds> </exec> </prebuild> - Web site
CruiseControl will create a web site for you to view and manage the building process
The url is: https://buildhost/ccnet
- Download